Showing posts with label Windows. Show all posts

Friday, June 2, 2023

How to setup your own private, secure, free VPN on the Amazon AWS Cloud


How to setup your own private, secure, free VPN on the Amazon AWS Cloud


Virtual private networks (VPNs) offer several benefits, including:

  • Increased security: A VPN encrypts your data, making it much more difficult for hackers to steal your personal information or track your online activity. This is especially important when using public Wi-Fi, as these networks are often unsecure and vulnerable to attack.
  • Improved privacy: A VPN hides your IP address, which is a unique identifier that can be used to track your online activity. This makes it more difficult for websites, advertisers, and other third parties to track your online behavior.
  • Access to geo-restricted content: A VPN can be used to bypass geo-restrictions, which are restrictions that prevent users from accessing certain websites or content based on their location. This can be useful for accessing streaming services, social media platforms, or other websites that are not available in your region.
  • Reduced bandwidth throttling: Some internet service providers (ISPs) may throttle the bandwidth of certain websites or services, such as streaming services or file-sharing applications. This can lead to slower speeds and buffering. A VPN can help to prevent bandwidth throttling by encrypting your traffic and making it more difficult for your ISP to identify what you are doing online.
Overall, a VPN can be a valuable tool for improving your online security, privacy, and access to content. If you are concerned about your online security or privacy, or if you need to access geo-restricted content, then a VPN is a good option to consider.

Advantages of a private VPN server:

Simple to set up: Even non-technical users can set up a private VPN server in just 10 minutes.Dedicated: You will have a dedicated VPN server for your own use, which means that you will not have to share it with anyone else.Secure: Your data will be encrypted and protected by a password. No logs will be kept of your activity.On demand: You can start and stop the VPN server as needed.Global: You can choose from one of 14 worldwide regions for your VPN server.
  • Wide device support: The VPN server can be used on a variety of devices, including Android, iPhone, iPad, PC, Mac, and even most routers.
Free: New Amazon AWS customers can get a free tier server for the first year.

Steps to set up a private VPN server on AWS:


1. Create a free Amazon AWS account. You can do this by visiting https://aws.amazon.com/free/ and clicking on the "Sign Up" button.

2. Select a region for your VPN server. You can choose from Mumbai, California, Ireland, Frankfurt, Singapore, Tokyo, Sydney etc.


3. Open the CloudFormation service in the AWS Management Console. You can do this from the search menu, type "CloudFormation" and click on it.
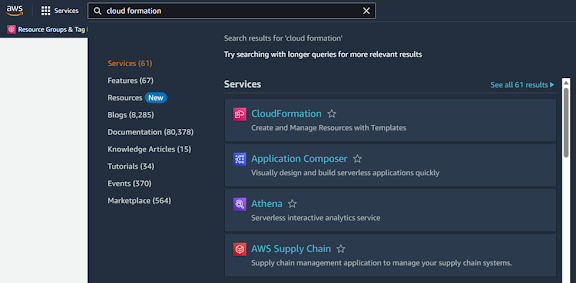


4. Create a stack with CloudFormation. Click on “Create Stack” button on top of the page.


5. Download the JSON template file from here.

6. Select "Upload a Template File" from the below screen and upload the downloaded JSON file.


7. Enter a stack name for your VPN server. For example, you could use "VPN". Select the speed as “Standard.VPN-Free".


8. Enter a username and password for your VPN server.

9. Enter a passphrase for your VPN server.

10. Click Next twice and submit.

11. The VPN server will be created in a few minutes. You can monitor the progress of the creation process by clicking on the "Stacks" tab in the CloudFormation service.


12. Once the stack status shows as CREATE_COMPLETE you can then click on the Outputs tab.

13. Now in the outputs tab you can see the server IP address.
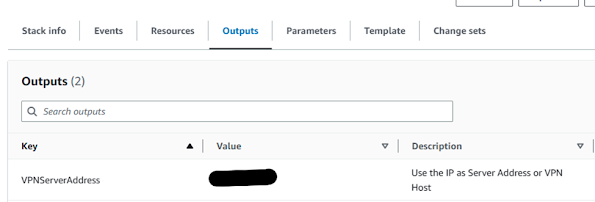


14. You can now connect to your VPN server using the IP address and the username and password that you created.

How to connect to your private VPN server:


Different devices have different ways to connect to a VPN server. Here are some instructions for connecting to a VPN server on a few popular devices. Keep in mind that your private VPN server supports both PPTP and L2TP with IPSEC. This means that your VPN server can be used with most devices, including older routers. You can connect to your VPN server using either PPTP or L2TP, whichever is supported by your device.

Here are some examples of how to connect to a VPN server on popular devices:

Android: On an Android device, open the Settings app and go to Network & Internet > VPN. Tap the Add button and select PPTP or L2TP. Enter the VPN server's IP address, username, and password, and then tap the Connect button.

iOS 13 or above: On an iOS device, open the Settings app and go to VPN. Tap the Add VPN Configuration... and select Type IPSec. Enter a name under Description. Enter the VPN server's IP address, username in Account, password in Password and Secret (PassPhrase), and then tap the Done button.

Windows: On a Windows computer, open Settings and go to Network & Internet > VPN. Click on the Add a VPN Connection. Enter the Connection name, VPN server's IP address in the IP address. Enter the VPN server's username and password in the User name and Password fields, and then click on the OK button.

Once you have connected to your VPN server, your traffic will be encrypted and routed through the VPN server. This will protect your privacy and security when you are using public Wi-Fi or when you are accessing websites or services that are blocked in your region.

Sunday, November 6, 2022

Install Telnet Client using Command line and PowerShell

Command Line:

pkgmgr /iu:"TelnetClient"

PowerShell:

Install-WindowsFeature Telnet-Client

Windows couldn't complete the updates

Error:

Windows couldn't complete the updates Undoing changes. Don't turn off your computer.

Solution:

Boot OS from Command prompt

net stop wuauserv

net stop bits

rename c:\windows\SoftwareDistribution SoftwareDistribution.bak

net start wuauserv

net start bits

Reboot the system

Friday, November 4, 2022

Event ID 4625 Null SID Guest account currently disabled

An account failed to log on.

Subject:

Security ID: Domain\Administrator

Account Name: Administrator

Account Domain: Domain

Logon ID: 0x4DEEDAB8

Logon Type: 3

Account For Which Logon Failed:

Security ID: NULL SID

Account Name: Guest

Account Domain: Computername

Failure Information:

Failure Reason: Account currently disabled.

Status: 0xC000006E

Sub Status: 0xC0000072

Process Information:

Caller Process ID: 0x5acc

Caller Process Name: C:\Windows\explorer.exe

Network Information:

Workstation Name: Computername

Source Network Address: -

Source Port: -

Detailed Authentication Information:

Logon Process: Advapi  

Authentication Package: Negotiate

Transited Services: -

Package Name (NTLM only): -

Key Length: 0

This event is generated when a logon request fails. It is generated on the computer where access was attempted.

The Subject fields indicate the account on the local system which requested the logon. This is most commonly a service such as the Server service, or a local process such as Winlogon.exe or Services.exe.

The Logon Type field indicates the kind of logon that was requested. The most common types are 2 (interactive) and 3 (network).

The Process Information fields indicate which account and process on the system requested the logon.

The Network Information fields indicate where a remote logon request originated. Workstation name is not always available and may be left blank in some cases.

The authentication information fields provide detailed information about this specific logon request.

- Transited services indicate which intermediate services have participated in this logon request.

- Package name indicates which sub-protocol was used among the NTLM protocols.

================================================================

That must be not the remote computer attempt to logon your server, if it does and failure, the security log will log “Unknown username or bad password”.

The Network Information fields indicate where a remote logon request originated. The workstation name is not always available and may be left blank in some cases.

It's by design. The core issue for that is that Network and Sharing Center wants to know whether the guest account is enabled for network access

Solution:
Remove "Everyone" NTFS permission from the shared folder.


Reference: 

Event ID 4625 Null SID Guest account currently disabled (microsoft.com)

Friday, July 10, 2020

How to enable LockScreenSlideShow in Windows 10 through GPO


How to enable LockScreenSlideShow in Windows 10 through GPO

GPO (Computer)

Path: Policies\Administrative Template\Control Panel\Personalization
Setting: Prevent changing lock screen and logon image
State: Enabled

Setting: Prevent enabling lock screen camera
State: Not Configured

Setting: Prevent enabling lock screen slide show
State: Not Configured

Path: Policies\Administrative Template\System\Logon
Setting: Turn off app notifications on the lock screen
State: Not Configured

Path: Policies\Administrative Template\Windows Components\Search
Setting: Default indexed paths
State: Enabled

Enter the path as “C:\Windows\Web\LockScreenSlideshow”

Use SCCM to create a folder named “LockScreenSlideShow” under the path “C:\Windows\Web\” and push all the slide show images here. (Do Not Change the path)

Registry Keys (Computer)

Path: HKEY_LOCAL_MACHINE\SOFTWARE\Microsoft\Windows\CurrentVersion\Explorer\VisualEffects\ControlAnimations
Value Name: SPIActionSet
Type: REG_DWORD
Value Data: 4163 (Decimal)

Path: HKEY_LOCAL_MACHINE\SOFTWARE\Microsoft\Windows\CurrentVersion\Explorer\VisualEffects\ControlAnimations
Value Name: UncheckedValue
Type: REG_DWORD
Value Data: 0 (Decimal)

Path: HKEY_LOCAL_MACHINE\SOFTWARE\Policies\Microsoft\Windows\System
Value Name: DisableLogonBackgroundImage
Type: REG_DWORD
Value Data: 1 (Decimal)

Registry Keys (User)

Path: HKEY_CURRENT_USER\Software\Policies\Microsoft\Windows\Control Panel\Desktop
Value Name: C:\windows\.scr
Type: REG_SZ
Value Data: Delete

Apply the above key only this key exists on your client machines.

Path: HKEY_CURRENT_USER\Software\Microsoft\Windows\CurrentVersion\Lock Screen (String)
Value Name: SlideshowDirectoryPath1
Type: REG_SZ
Value Data: SHAFA8BUg/E0gouOpBhoYjAArADMdmBAvMkOcBAAAAAAAAAAAAAAAAAAAAAAAAgVAEDAAAAAAg4TkAEEAcVauR2b3NHAABQCAQAAv77iMFJqI+EJA5CAAAQwNKAAAAACAAAAAAAAAAAAAAAAAAAAZmAkAcFApBgbAQGAvBwdAMHAAAgFAoEAxAAAAAAAJ+EdeBBAXVmYAgDAJAABA8uvLy0y8m4T05lLAAAAORvAAAAAcAAAAAAAAAAAAAAAAAAAAQ6fXEwVAUGAiBAAAIBADEQMAAAAAAQiPFXLQAATPN0STNkfxAAAYBQCAQAAv7LiPZ3YJ+Uct4CAAAA4iAAAAAgLAAAAAAAAAAAAAAAAAAAAhvyLAwEAvBwYAsGATBwYAIHAlBQZA4GATBAbAkGAkBQZAMHAoBwbAcHAAAAGAMJAAAwJA8uvFCAAAEzUQN1td66/Nyx/DFIjECkOjOXLpBAAAQGAAAAAfAAAAwCAAAwdAkGAuBAZA8GA3BwcA4CApBQbA0GAlBgcAMHApBgdAUGAjBwbA4GA0BgcA8GAsBAcAEGAuBQZAwGAfBwYAcHA1AgbAEDAoBgMAQHA4BQeAUGA3BQeAAAAAAAAAAAAAAAGAAAA

The above value is an encrypted path for "C:\Windows\Web\LockScreenSlideshow\"
COPY PASTE THE ABOVE KEYS CAREFULLY and DO NOT CHANGE THE PATH

Path: HKEY_CURRENT_USER\Software\Microsoft\Windows\CurrentVersion\Lock Screen
Value Name: SlideshowEnabled
Type: REG_DWORD
Value Data: 1 (Decimal)

Path: HKEY_CURRENT_USER\Software\Microsoft\Windows\CurrentVersion\Lock Screen
Value Name: SlideshowSourceDirectorySet
Type: REG_DWORD
Value Data: 1 (Decimal)

Path: HKEY_CURRENT_USER\Software\Microsoft\Windows\CurrentVersion\Lock Screen
Value Name: SlideshowIncludeCameraRoll
Type: REG_DWORD
Value Data: 0 (Decimal)

Path: HKEY_CURRENT_USER\Software\Microsoft\Windows\CurrentVersion\Lock Screen
Value Name: SlideshowOptimizePhotoSelection
Type: REG_DWORD
Value Data: 0 (Decimal)

Path: HKEY_CURRENT_USER\Software\Microsoft\Windows\CurrentVersion\Lock Screen
Value Name: SlideshowLayout
Type: REG_DWORD
Value Data: 1 (Decimal)

Path: HKEY_CURRENT_USER\Software\Microsoft\Windows\CurrentVersion\Lock Screen
Value Name: SlideshowInterval
Type: REG_DWORD
Value Data: 10000 (Decimal)

Path: HKEY_CURRENT_USER\Control Panel\Desktop
Value Name: UserPreferencesMask
Type: REG_Binary
Value Data: 9E1E078010000000

Path: HKEY_CURRENT_USER\Software\Microsoft\Windows\CurrentVersion\Explorer\VisualEffects
Value Name: VisualFXSetting
Type: REG_DWORD
Value Data: 3 (Decimal)

Path: HKEY_CURRENT_USER\Control Panel\Desktop\WindowMetrics
Value Name: MinAnimate
Type: REG_DWORD
Value Data: 0 (Decimal)

To Set Specific Image for Logon Screen

Path: Policies\Administrative Template\Control Panel\Personalization
Setting: Force a specific default lock screen and logon image
State: Enabled and Select option "Path to Lock Screen Image"    

Enter the path as "C:\Windows\Web\Screen\LoginPage.png"
The path can be changed and place your own image file.

Search this Blog

Note :

Infolinks In Text Ads